1
Nov 2015
by
小川 岳史
CloudFront は「SNI 独自 SSL」か 「専用 IP 独自 SSL」のどちらかの方法で HTTPS 通信の設定が可能。
| SNI 独自 SSL | 無料だけど、古いブラウザは対応してない(IE6 以下など) |
| 専用 IP 独自 SSL | 月 600 USD 必要 |
ということで今回は無料の「SNI 独自 SSL」にて。
...そして、最初につまづく。
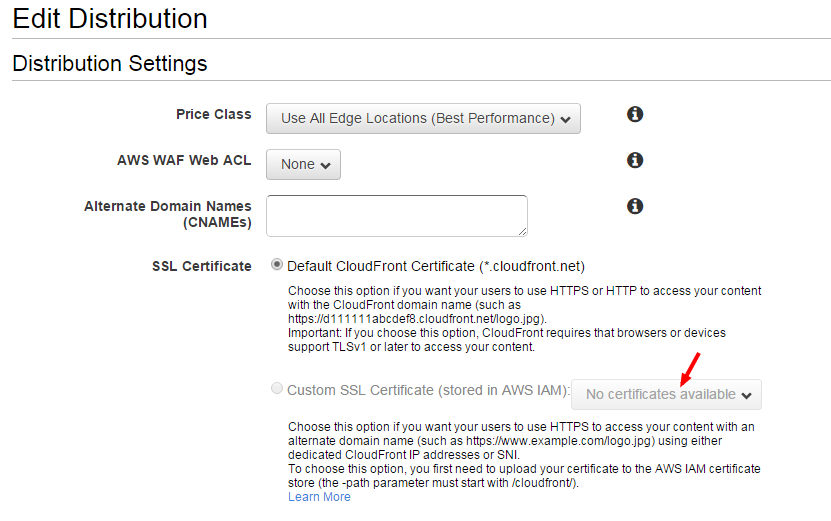
CloudFront の設定画面では Custom SSL Certificate が非アクティブで選択できない。
SSL 証明書はどこから設定するのか??

以下のように書いてある。
To choose this option, you first need to upload your certificate to the AWS IAM certificate store (the -path parameter must start with /cloudfront/).
どうやら証明書のアップロードはまだコンソールからはできない。
http://docs.aws.amazon.com/ja_jp/IAM/latest/UserGu...
IAM にサーバー証明書をアップロードするには、AWS Command Line Interface、Tools for Windows PowerShell、または AWS API を使用できます。
とりあえず、手元の端末が Windows なので PowerShell でやってみる。
上記キャプチャの注釈にあった、/cloudfront/ の設定がここで必要になる。
以下がそのコマンド。
Publish-IAMServerCertificate `
-Path /cloudfront/ `
-ServerCertificateName <CERTIFICATE_NAME> `
-PrivateKey ((Get-Content -Path server.key -ReadCount 0) -join "`n") `
-CertificateBody ((Get-Content -Path server.crt -ReadCount 0) -join "`n") `
-CertificateChain ((Get-Content -Path chain.crt -ReadCount 0) -join "`n")
コマンドが成功すると以下のように出力された。
Arn                   : arn:aws:iam::949487068828:server-certificate/cloudfront/<CERTIFICATE_NAME>
Expiration            : 2016/09/01 5:42:51
Path                  : /cloudfront/
ServerCertificateId   : ASCAJUZV2IS2COIGVZHGQ
ServerCertificateName : <CERTIFICATE_NAME>
UploadDate            : 2015/11/01 18:01:52
これで再度コンソールにアクセスすると、「Custom SSL Certificate」からでアップロードした証明書が選択可能になっているので、これでめでたく設定完了!
