What is Amazon Web Services (AWS)?
Well, AWS is the web services provided by Amazon. A pretty straight forward name, isn't it?
Okay, okay. I know the "explanation" above does not really help, but I am trying to avoid answering "what is AWS" directly, on purpose.
AWS includes various services and resources for different needs, and I can do no better on explaining "what is AWS" than the results you can find via Google or the official site.
Instead, let me show you my understanding as a beginner of certain AWS services.
What are AWS Virtual Private Cloud (VPC) and Elastic Compute Cloud (EC2)?
For those who are patient enough, first refer to the official AWS Documentation: Search for VPC and EC2.
Then, if you are still confused as I was, try to think like this: Using AWS is like you are renting things from Amazon. EC2 is a computer to rent and VPC is a network service.
Notice that although I said using EC2 is like renting a computer from Amazon, there will be no mainframe, desktop computer or laptop physically visible or touchable for you. You rent and use it remotely, which is the core idea of cloud services.
Why would I need VPC and EC2?
First of all, if you need any AWS you are probably providing some kinds of web application to others via the internet. Someone who only needs a laptop and writes a MS Word document with it, will never get to Amazon asking for anything. That is why we need both a computer and a network.
But why would I rent them from Amazon? Why can't I just use the laptop/desktop computer I have and my home/office network?
The answer is, of course you can do so, but imagine the followings:
If the service/application you provide needs to be 24/7/365, can you afford to let your machine and network keep running like that?
Even if you can afford that, can you ensure that there will be no power outage or any accident, so that there will be no loss for your or your client's business/assets?
Moreover, even if you have ensured such a stable local environment, how much have you spent? You may want to compare how much it costs for the similar things via AWS.
These are some of the various reasons why people, especially enterprises, are using AWS.
How do I start with VPC and EC2?
In real life, you can either buy a laptop first and then call a network provider to set up the internet service for your home/office, or vice versa; then you can connect your new laptop to the internet and browse contents online.
Things are slightly different with AWS. If you want to rent a computer (EC2), you need to have your own network (VPC) first.
How do I start with VPC?
First, sign in to the AWS Console. (You can sign in via the button on the top right corner of the documentation page, for example)
As a side note, AWS configuration can also be done with AWS CLI and API. But for beginners like me, it is always more friendly to start with tools with GUI like the console, then move forward to code-based stuff later when you are experienced enough.
In the Console, find VPC by searching.
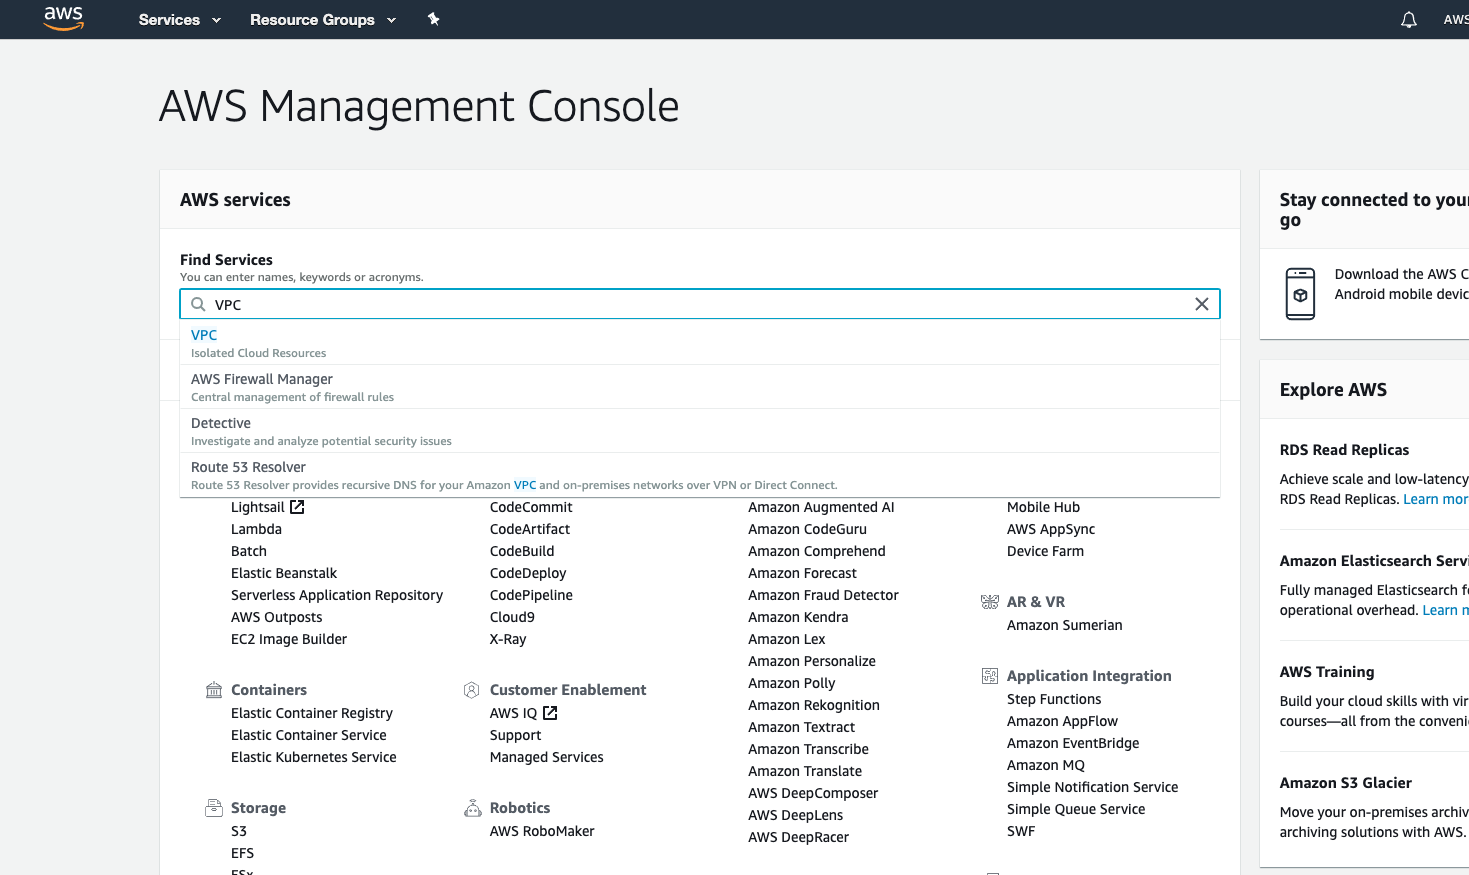
Click on VPC, you will be directed to VPC dashboard.
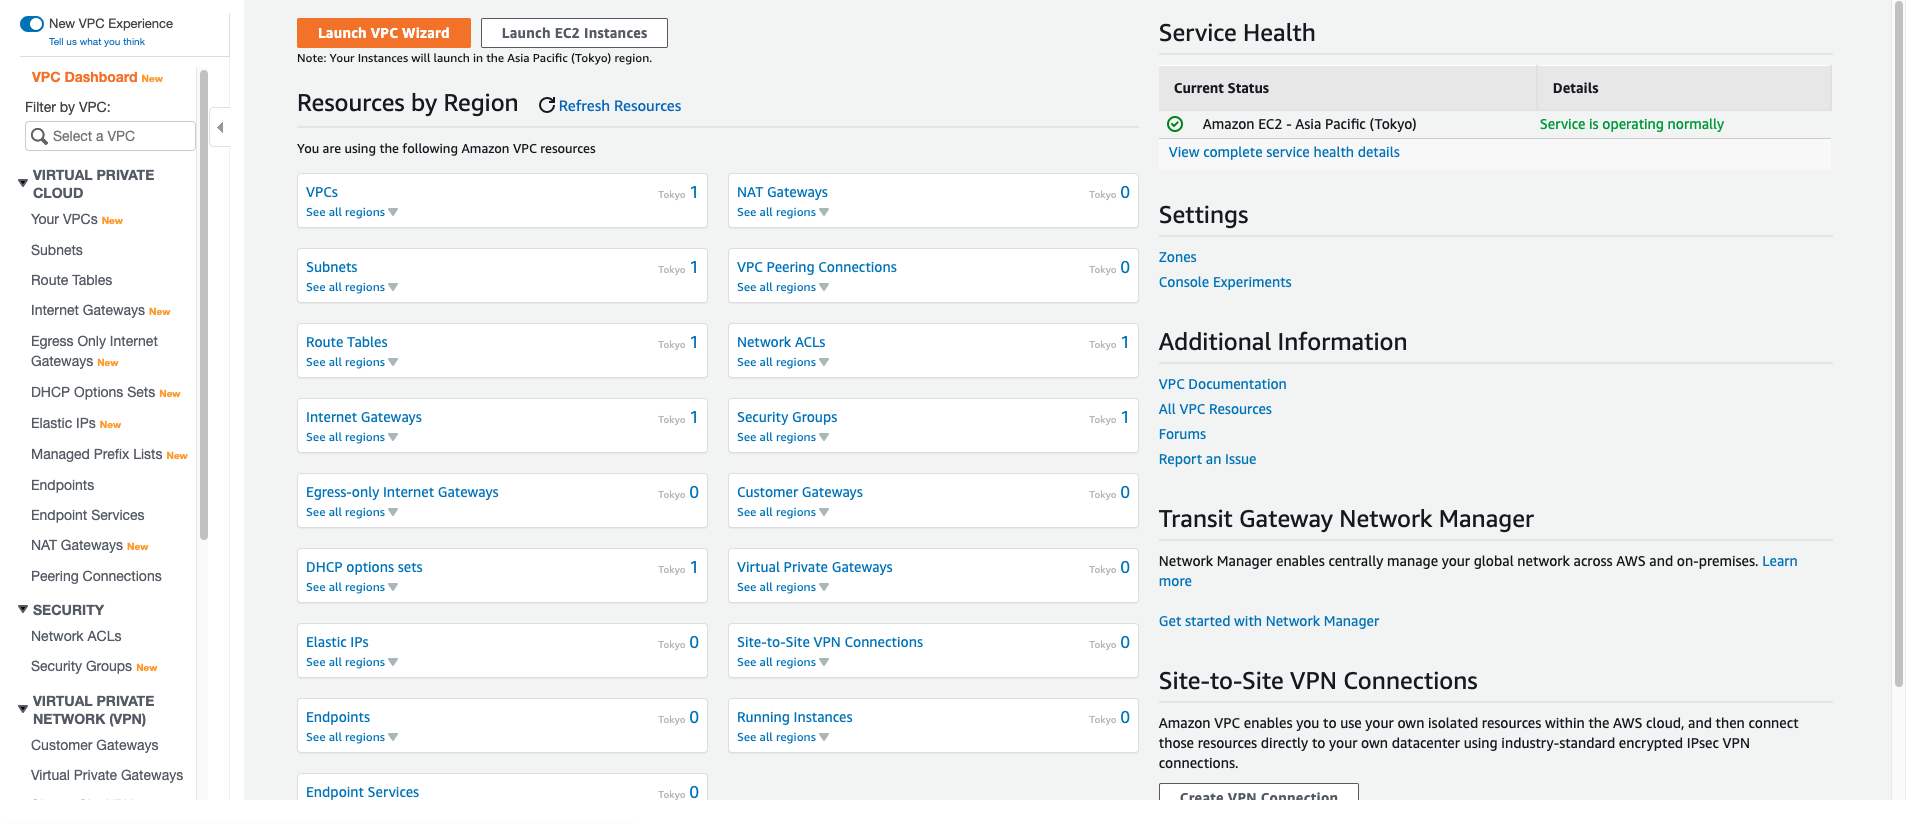
You may find out under Your VPCs/VPCs that there is already a default VPC. Yes, I lied a little bit: You are actually able to "rent a computer" already. However, a good practice is that not to use the default VPC (or almost anything in default), so let us create one on our own. (Reference: Why not using default VPC)
Create a VPC
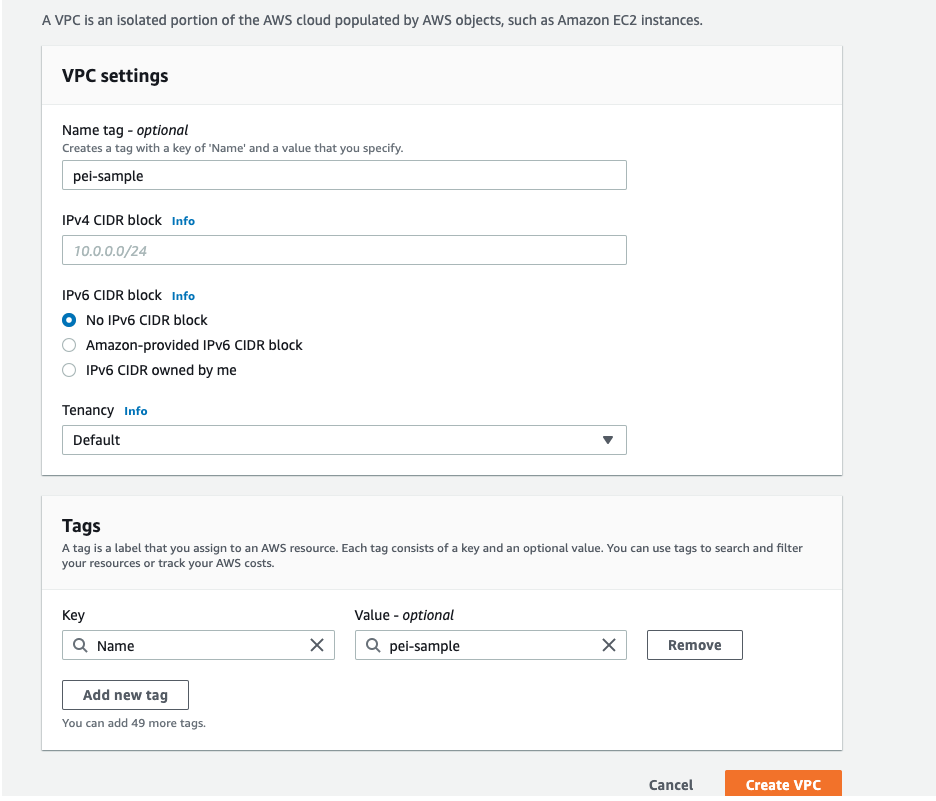
In the VPC page, click on Create VPC. Give your new VPC a name of your choice, and decide the IPv4 CIDR block. I put "pei-sample" for the name and 10.0.0.0/16 for the CIDR block, for example. Leave everything else unchanged.
Create an Internet Gateway
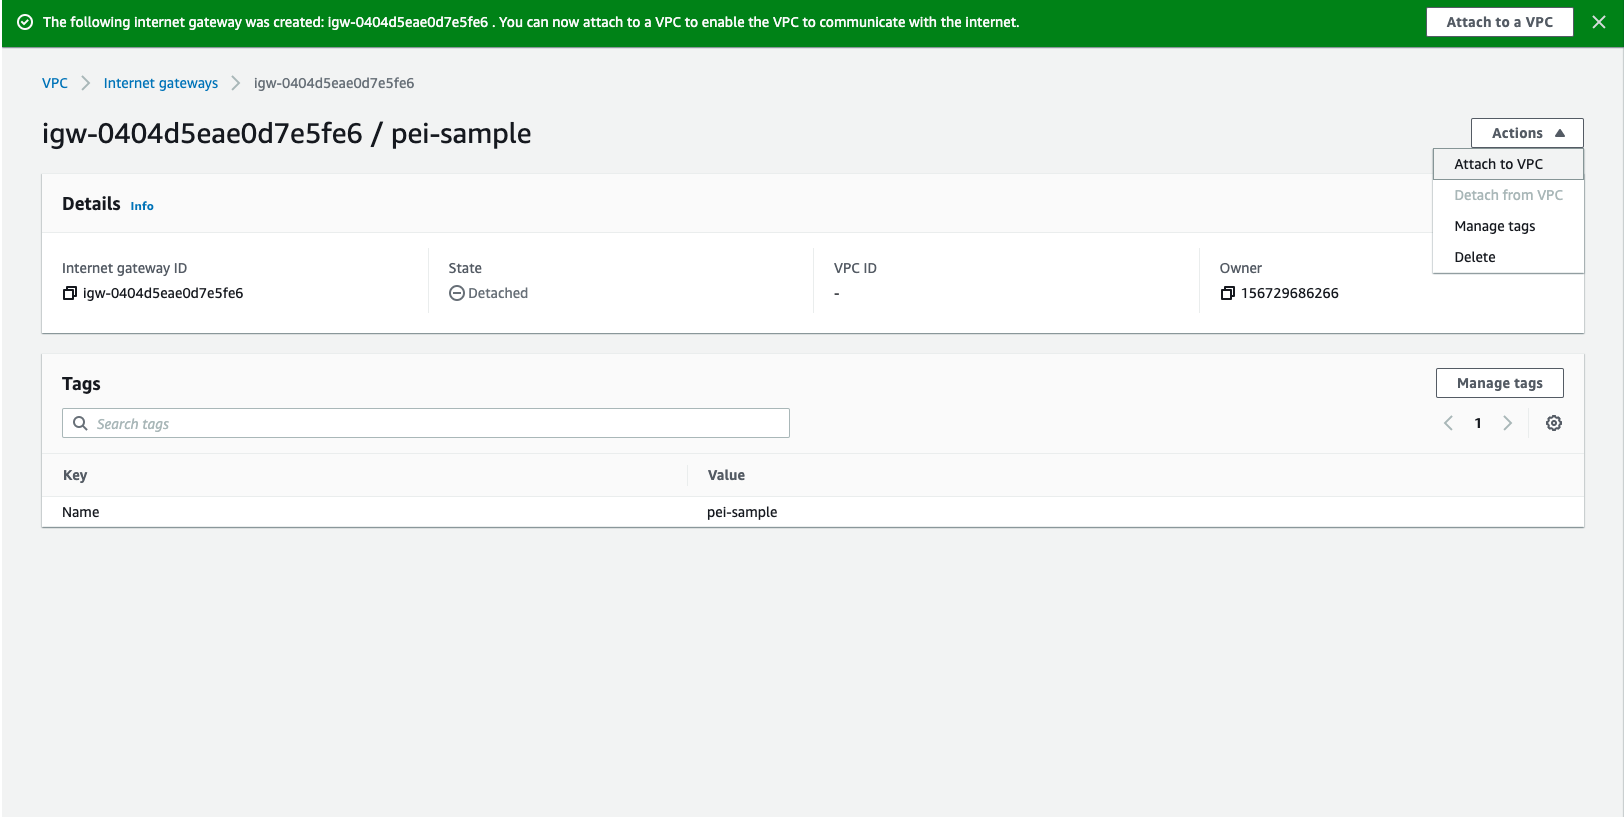
Next, we need to create an Internet Gateways (igw), which you can find under VPC dropdown menu on the left of the page. It is necessary because our VPC will not be connected to the public internet without it. (Again you will see a default one, but let us just ignore it)
Give the new igw a name and click on Create, then in the returned page click Attach to VPC from the Action dropdown menu near the top right corner. This is telling Amazon for which VPC we would like it (or some recourses within it) to connect to the internet, so for sure we are attaching it to the just created VPC pei-sample.
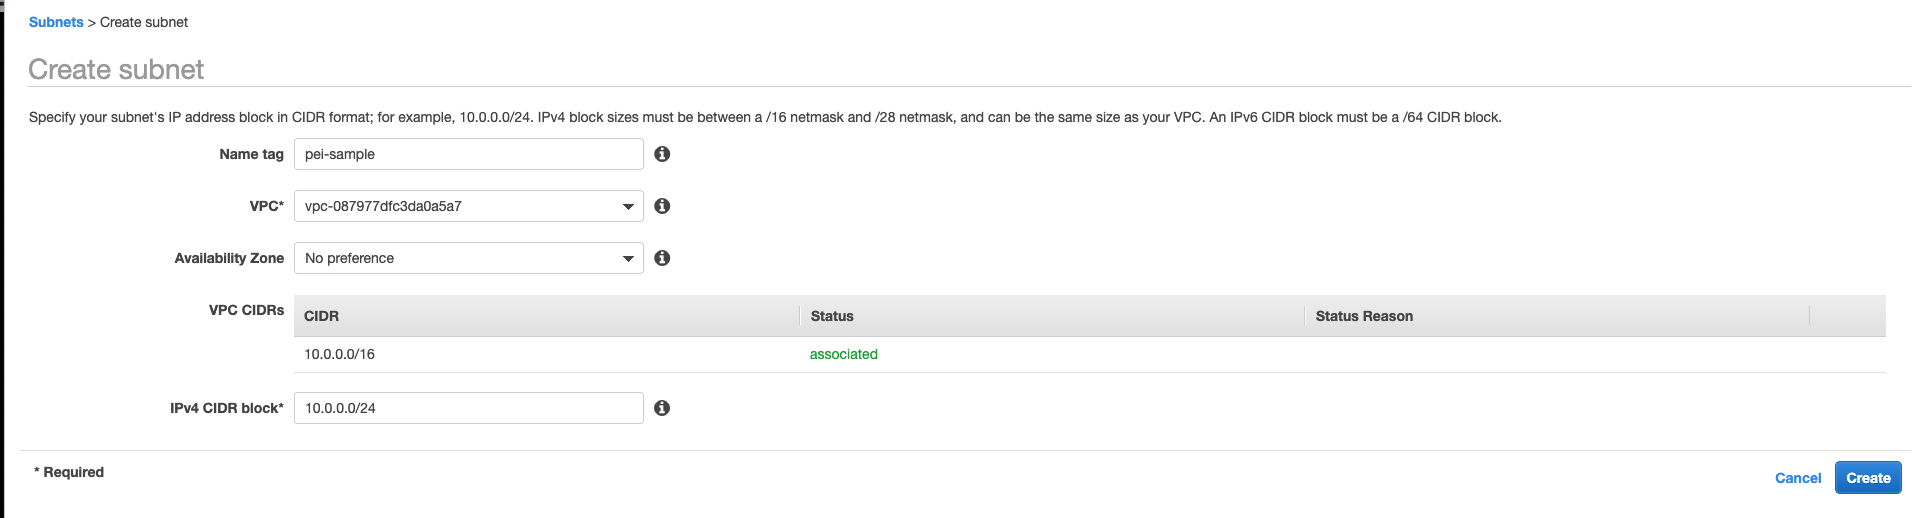
Create a Subnet
Now we will create a subnet. It is a good practice, for security reasons, to keep the server instance in a protected/private subnet and redirect the public access reaching a public subnet to the server instance in the protected/private subnet. But that will involve the use of NAT Gateway and Load Balancer, so for simplicity we will only create a public subnet in this tutorial and let the public internet access it directly.
Go to the Subnets page under the VPC menu on the left, and click on Create subnet. Just fill in the name, select the VPC (pei-sample in my case), and give it a CIDR block.
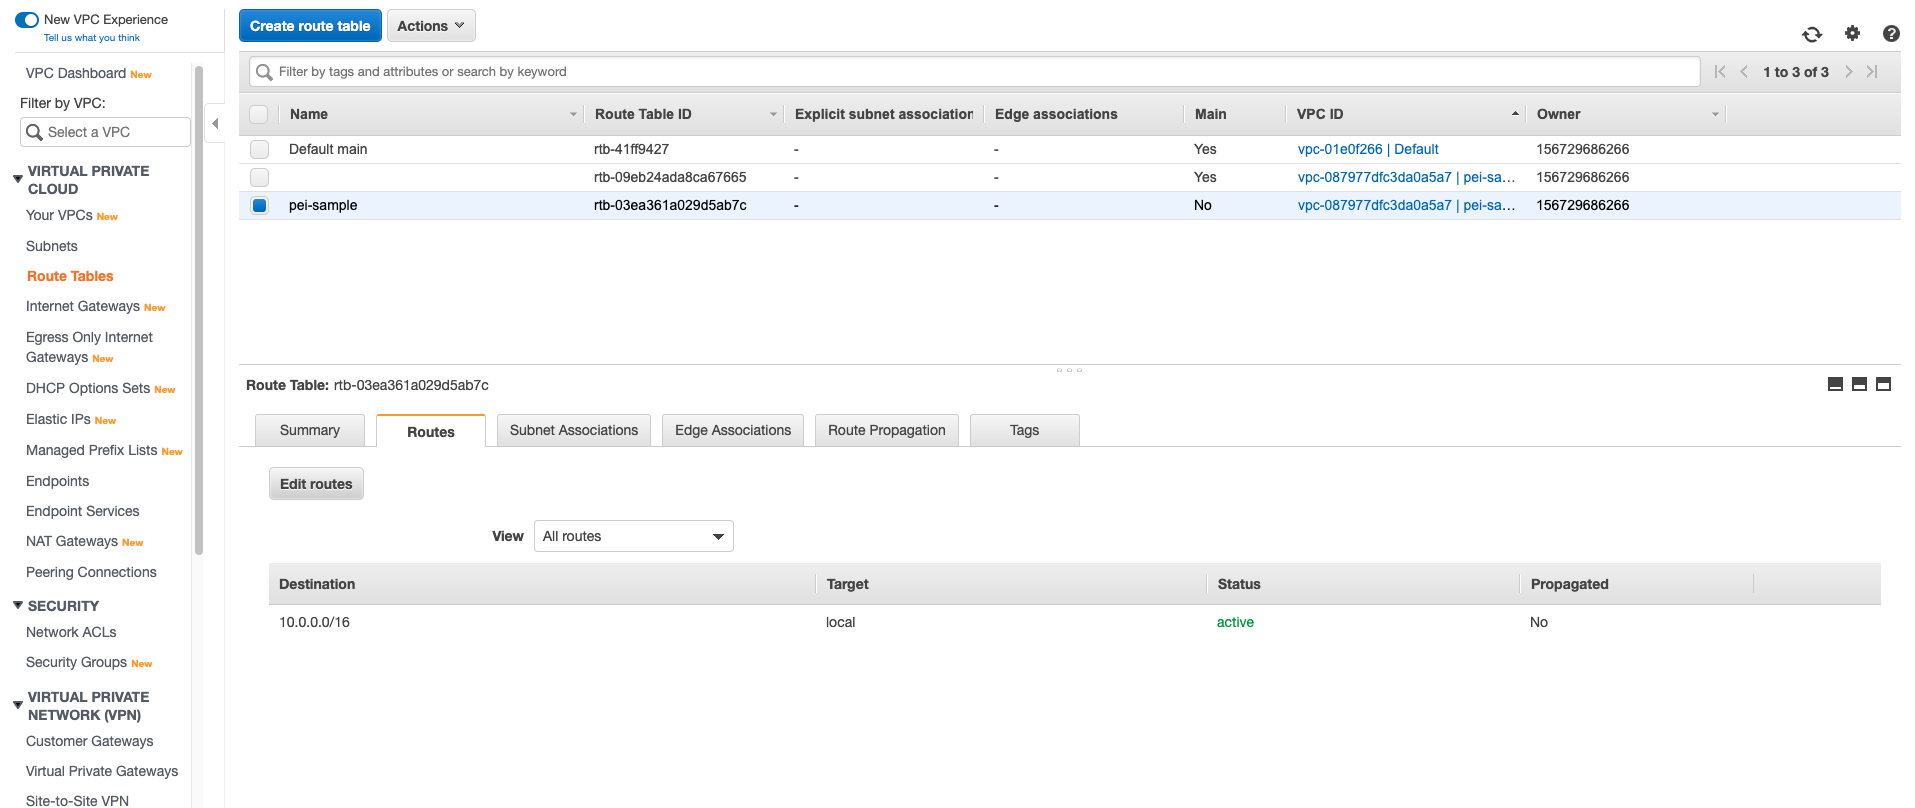
Create a Route Table
We just created a subnet in the last step, but wait, what makes it a "public" subnet? The answer is the Route Table. A route table controls what kind of traffics can go into and go out from a subnet.
After you create the route table, select it and in the bottom click on Routes -> Edit routes.
Add a route with 0.0.0.0/0 as the destination and the igw as the target. Doing so will allow the subnets which are associated to this route table to communicate with the public internet.
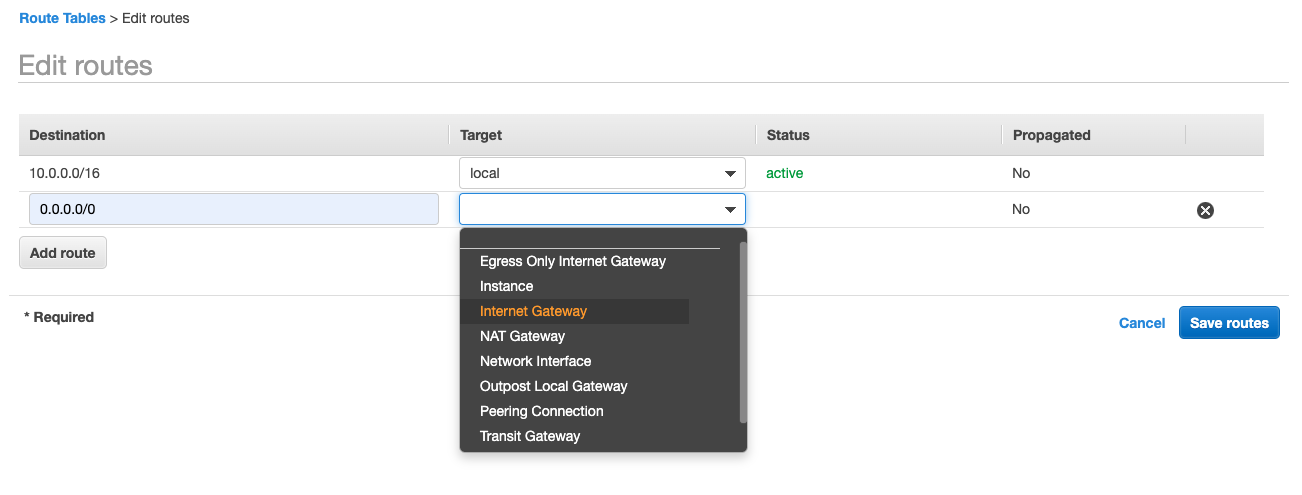
But we have not associate the subnet to the route table yet. Go to Subnets page and select your subnet. In the menu below go to Route Table -> Edit route table association, and associate it to the route table connected to the igw.
Here we have done all the "renting and setting up a network" part. We will now move on to "renting a computer (EC2 instance)" to run our server.
How do I start with EC2?
EC2 is the computing resources we will rent from Amazon. From the same place where you go to VPC dashboard, go to EC2 dashboard. Then, click on Launch Instance. Launching an instance involves many settings, while we will only set up what are necessary for this beginner's tutorial.
Create an EC2 Instance
First, you will have to choose an Amazon Machine Image (AMI). Read the line description starting with "An AMI is..." in thie Step 1 page, which tells you what this is. We will just select Amazon Linux 2 with 64-bit x86 architecture (note that Amazon will stop the security support for Amazon Linux, the old version of Amazon Linux 2, very soon - at the end of 2020).
For the instance type, the default one, t2.micro has the second lowest specification, but is free if you meet the requirements (check the description by hovering your mouse on the green label "Free tier eligible". If you do not meet the requirements, you may want to check if the nano instance is cheaper and use it.
The idea is that for this sample tutorial we will not need a good performing machine at all, but any running one will do.
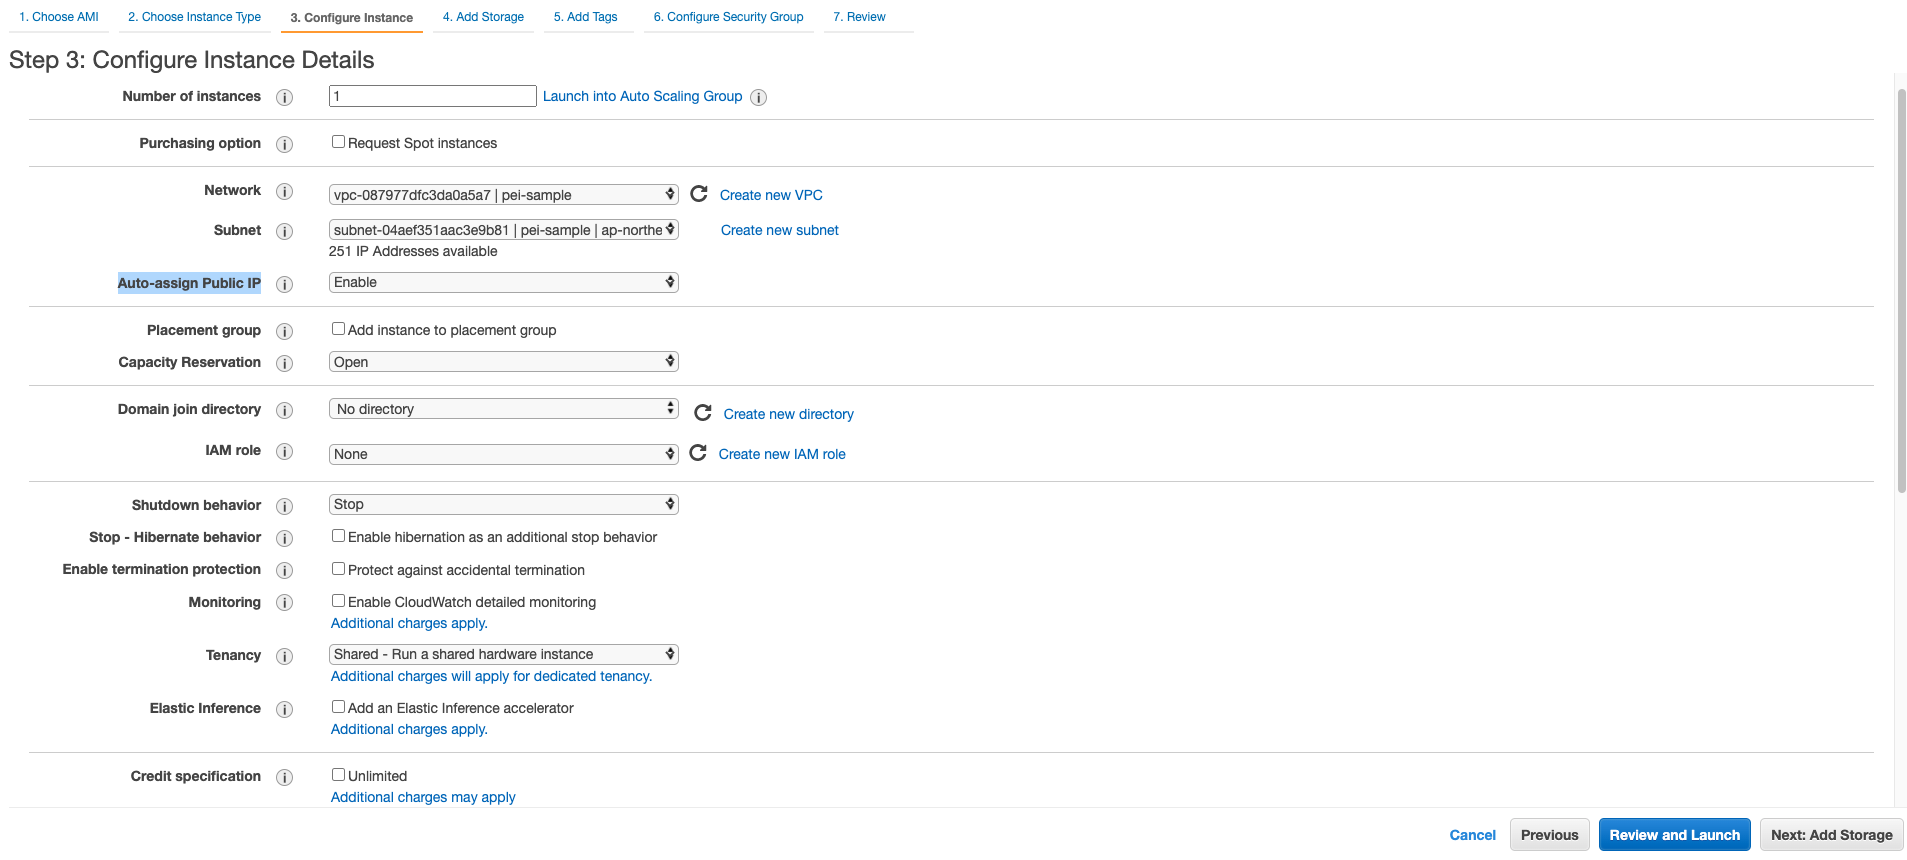
After you have decided the instance type to go with, be sure to select Next: Configure Instance Details, instead of Review and Launch.
Then in step 3, you finally need to do some small changes. Choose your VPC as the Network, the subnet (auto-selected if you have only 1 subnet under the VPC), and enable the Auto-assign Public IP.
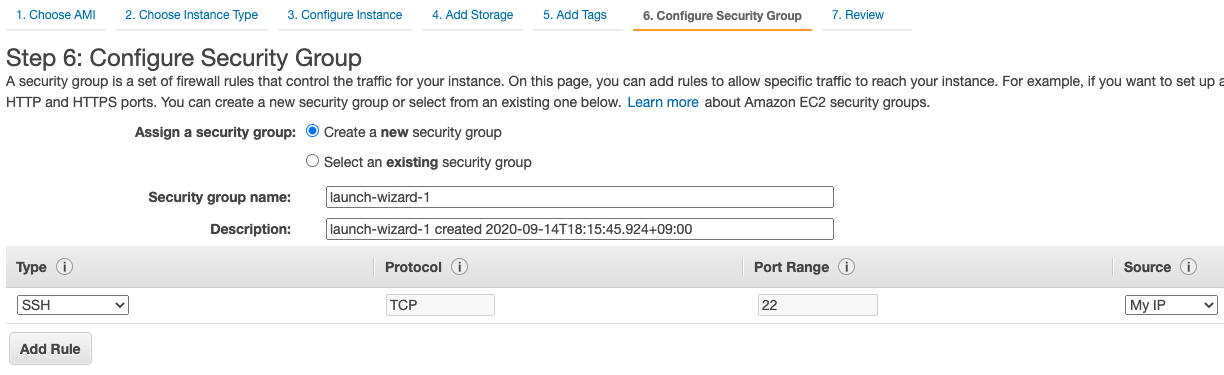
Keep clicking on Next, until you reach Step 6: Configure Security Group. Change only the source to My IP and add a description if you like to.
I forgot to rename the group and left it as launch-wizard-1... It is certainly better to use another name for it, as we are doing for other resources.
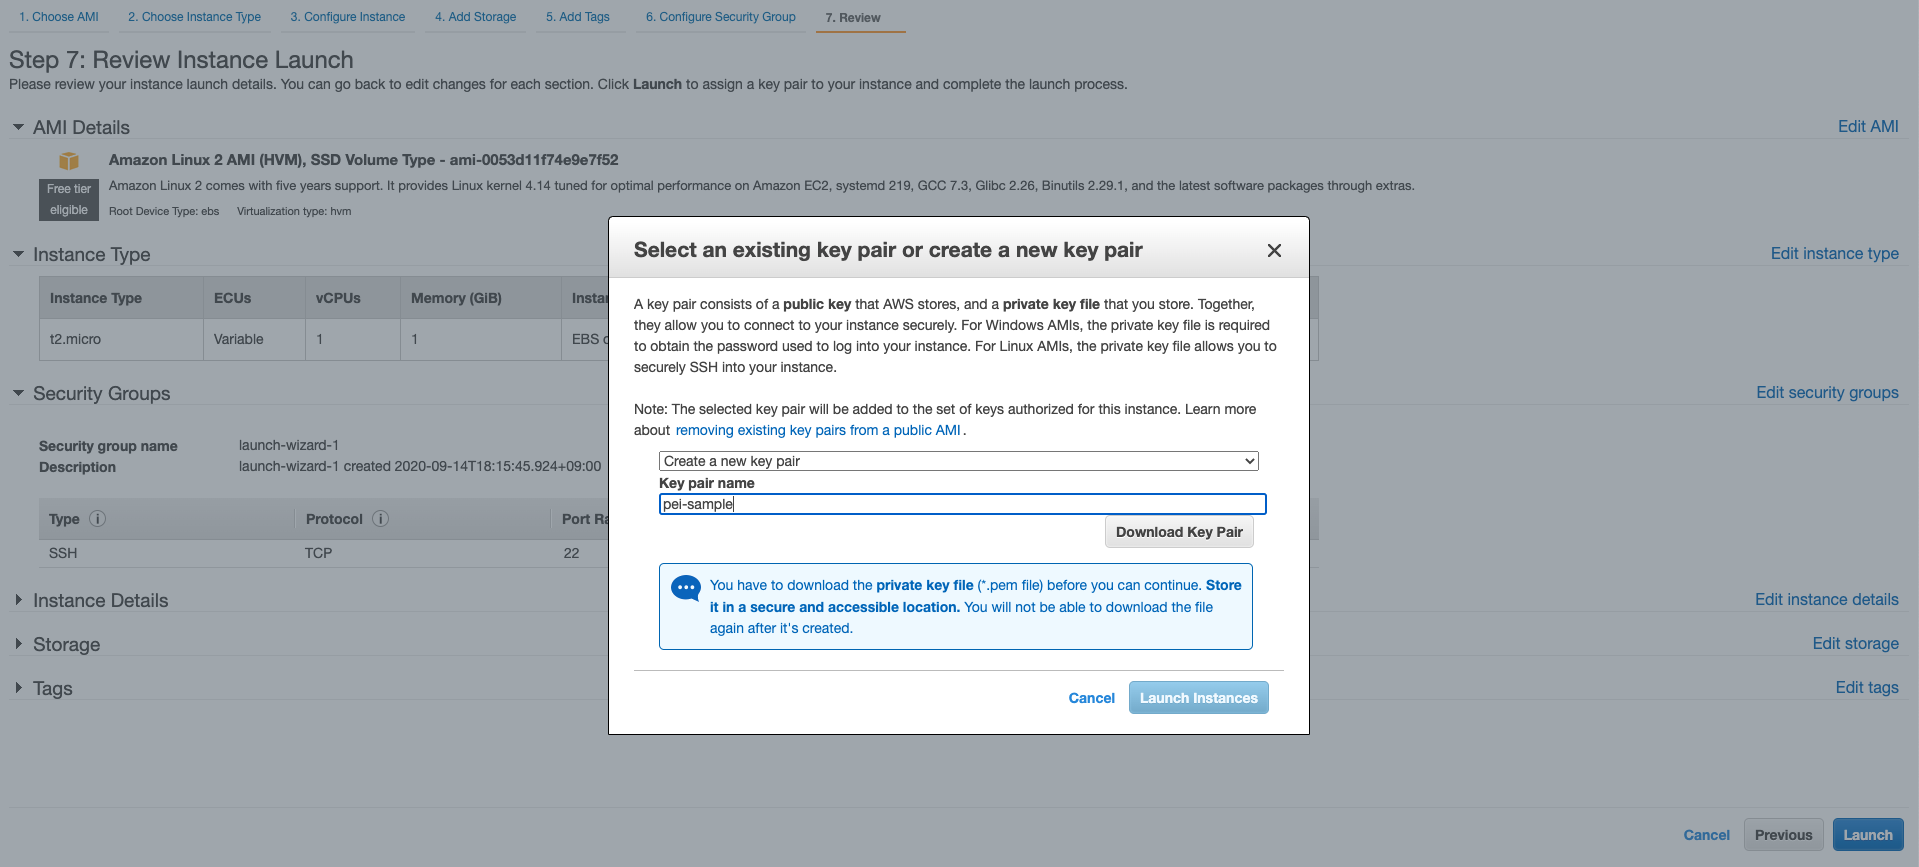
Review and launch it.
In the final page, after clicking on Launch you will be prompted to create a new key pair. Give it a name and download it to somewhere you can find it later. Then Launch Instances, and after a few seconds click on View Instances.
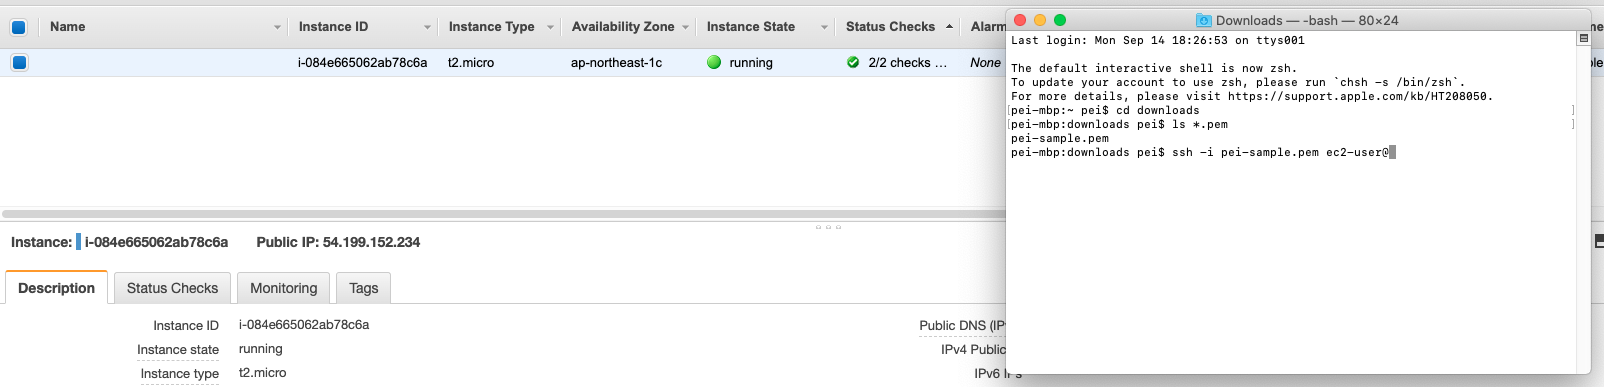
Wait another few seconds until the Instance State changes from a yellow pending to a green running. In the Description block in the bottom, find IPv4 Public IP and copy it.
Connect to the Instance via SSH
Open a terminal, cd to the directory where you save the key pair above, confirm that the key pair exists and using the following code to connect to the EC2 instance (paste the public IP after the @ symbol):
ssh -i pei-sample.pem ec2-user@
You will be prompt and just type 'yes' (without the single quotations).
Well, now you see the warning message and it is basically complaining about that the key pair is readable for other users too, other than the owner, which is seen as a security risk. So let us change the file permissions.
chmod 400 your-keypair-name.pem
The code above will do the work. In case you are not familiar with file permissions, you can use the code below to check for permissions before/after the change, and Google more about what file permissions are!
ls -l *.pem
Now let us try again with the ssh command. Congrats! You are connected to the EC2 instance.
Start the Web Server
We then need to install nginx in the instance we just connect to. Nginx is a free open source web server application.
sudo amazon-linux-extras install nginx1.12
You will be prompted and just type 'y' (without the single quotations).
After the installation is done, start the server using
sudo systemctl start nginx
The very last step needs us to go back to the security group we create during the EC2 instance configurations. You can find your security groups once you go to Network & Security -> Security Groups in EC2 menu.
Select the security group you created in Step 6: Configure Security Group above, which is launch-wizard-1 in my case (again, don't be as forgetting as me and remember to rename it when setting it up), and in the menu below go to Inbound rules -> Edit inbound rules.
Recall that we set up to allow the connection via ssh from our IP, so we can do what we have done in the terminal. Now we are going to allow the public access via a browser, so click on Add rule, set Type to HTTP and select Anywhere as source (or restrict to only the IP addresses which you want them to be able to visit your server).

Finally, Check the Running Server via a Browser Page!
Here comes the most exciting part which will let you feel that every cumbersome setting step you did before actually pays off!
Recall the public IPv4 address for the EC2 instance we used for ssh connection. Copy it again to a browser's address bar, and press enter/return key on your keyboard.
Congrats! Your server is running perfectly and you are now seeing the default page from the nginx server!

While you are done for this tutorial, other than thank you for your time on reading this, I recommend to take a minute to think about what you have done - not the details of all the settings, but conceptually.
You have made a server running, on a computing machine rent from AWS.
You have also made the server available to the public internet via networking, again, rent from AWS.
This is essentially the entire basic process of providing a web application publicly!
How do I clean up?
Since this is only a sample, you probably don't want the server to keep running meaninglessly. (remember, it COSTs money! You can always check the Billing dashboard which is updated daily)
To delete what we have created, you need to follow certain steps as well. In this part you need to rely on no pictures but yourself to find what I am saying!
First, Terminate the EC2 instance that running the server. You don't need to stop the server first.
Then, Detach the igw from the VPC and delete it.
Next, Delete the subnet we put the EC2 instance into.
Finally, Delete the VPC. Done! Nice and easy.