When I started learning how to code, I had no idea that there was such thing as a "test" in coding.
But there is, and it turns out they have numerous benefits.
This "test" that I am talking about is not like literally compiling and running your code to see if it works right. Testing (or "unit testing") in this context is writing codes to test each "unit" of code. A unit could mean several things, such as method, class, or component.
But the question is, how are unit tests written?
It would be quite difficult to write a test without any tool. That is where a framework like JUnit comes in handy. JUnit is a popular testing framework for Java, and lately I've been learning how to test my code using it.
In this article, I'd like to walk you through the basics of writing unit tests using JUnit.
--------
Unit tests using JUnit are usually written in a separate class (a.k.a. Test Class) that is specifically designed for tests.
Here's how to create one using IntelliJ:
1. First, create a new Maven project, or if you want to work with a project you already have, add a new Maven module to your project. Check here if you're not sure how to do this.
2. Create a new Java Class if you don't have one already. Make sure you have a method in it too (Use the code below if you're completely new to this).
public class Calculator {
  public int evaluate(String expression) {
    int sum = 0;
    for (String summand: expression.split("\\+"))
      sum += Integer.valueOf(summand);
    return sum;
  }
}
3. Select the class name, right click and choose Go To > Test. A dialog that says "Create New Test" should pop up.
4. Check all the methods you want to test, and click OK.
Hooray! Now you have a brand new Test Class ready. Your new Test Class should look something like this:
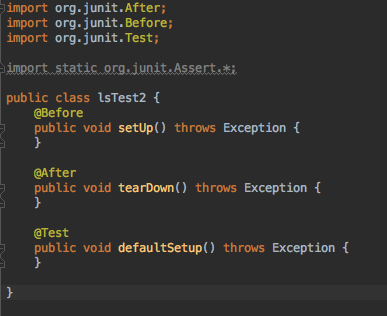
If you don't have @Before or @After, it's fine for now.
Moving on to writing your test methods:
In your test class, you will write test methods corresponding to the methods you have in your main code. When writing one, you must always begin with an "@Test" annotation for your IDE to be able to recognize that you are writing a test method.
A Test Method will usually test a method in your main code by comparing the expected result and the actual result produced by the method. One of the ways to do this is to use an assertEquals() method.
Here's an example:
public class CalculatorTest {
  @Test
  public void evaluatesExpression() {
    Calculator calculator = new Calculator();
    int sum = calculator.evaluate("1+2+3");
    assertEquals(6, sum);
  }
}
This method tests the evaluate() method in the Calculator class shown above. Here, the assertEquals() method is comparing "6" which is the expected value, and "sum" which is the actual value. When the test is run and the two values are equal, the test will pass, and if not, it will fail.
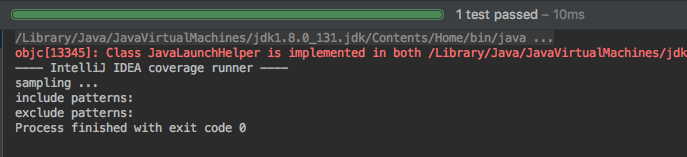
The output should look like this if the test passed:
Otherwise, it would look something similar to this:
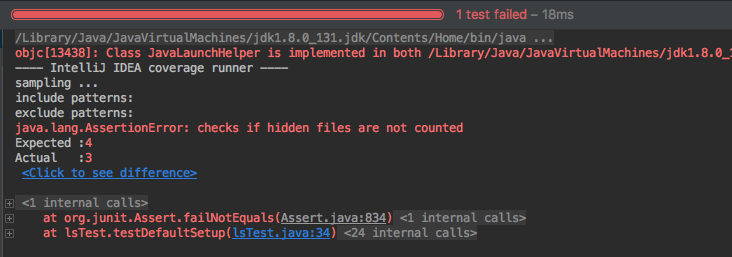
What's useful about JUnit is that if the test fails, it tells you why and how it had failed. In the image above, it seems like the actual value was three, whereas the expected value was 4.
By the way, both images are not the test results for the code above (CalculatorTest).
--------
This was a very simple example of writing a unit test using JUnit, but I think it is enough to get you started. If you want to get deep and learn more about JUnit, there are tons of resources out there so try checking them out by yourself.
That's all for today! Thanks for reading.
All the example codes used in this article were referenced from here.